IN THE SPOTLIGHT: MDE to MDB Conversion Service
(also supports: ACCDE to ACCDB, ADE to ADP, etc)
IN THE SPOTLIGHT: Access Database Repair Service
An in-depth repair service for corrupt Microsoft Access files
IN THE SPOTLIGHT: vbWatchdog
VBA error handling just got easier...

" vbWatchdog is off the chart. It solves a long standing problem of how to consolidate error handling into one global location and avoid repetitious code within applications. "
- Joe Anderson,
Microsoft Access MVP
Meet Shady, the vbWatchdog mascot watching over your VBA code →
(courtesy of Crystal Long, Microsoft Access MVP)
IN THE SPOTLIGHT: vbMAPI
An Outlook / MAPI code library for VBA, .NET and C# projects
Get emails out to your customers reliably, and without hassle, every single time.

Use vbMAPI alongside Microsoft Outlook to add professional emailing capabilities to your projects.
IN THE SPOTLIGHT: Code Protector
Standard compilation to MDE/ACCDE format is flawed and reversible.
Provided by Allen Browne, allenbrowne.com
If you have used the Wizards to create forms and reports, you will have also tried dragging controls to a new location in Design View. Moving PostalCode beside Town makes sense, especially if all controls don't fit on screen. You've probably figured out how to move a control separately from its label (larger black square at top left when the control is selected), how to select multiple controls (hold down Shift), and how to make a control just the right size ("Fit to Size" from the Format menu).
Getting controls to align correctly after dragging them around can be a chore! "Snap to grid" is useful, but often doesn't give the precise placement you want.. Too often you find yourself roughly aligning the controls and then going to the Format menu (Layout in Access 1) to get Align, Left for text boxes and Align, Right for labels. Then you select the ones on the same row and go back to the menu for Align, Top or Align, Bottom.
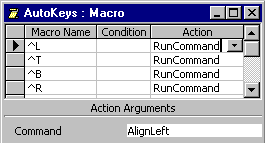
A keystroke such as Ctrl+L for align left or Ctrl+R for align right could speed things up. Here are the steps to get that result.
* Access 2: Choose DoMenuItem as the action, and in the lower pane, Form Design, Format, Align, Left.
* Access 1: Choose DoMenuItem as the action, and in the lower pane, Form Design, Layout, Align, Left.
There will probably be other operations to add to this macro to cover your needs. Try to avoid reassigning standard Windows keystrokes such as Ctrl+C and Ctrl+V (copy and paste).

By the way, did you know that an ampersand (&) can give you a keyboard shortcut to a control? For example, type &Animals as the caption for a button and Access underlines the "A" indicating that you can move the focus to that button with Alt+A.
| Home | Index of tips | Top |
Rate this article: 


This is a cached tutorial, reproduced with permission.
iTech Masters | VAT: GB202994606 | Terms | Sitemap | Newsletter